Smokey eyes for hooded eyes tutorial
If you have hooded eyes, you probably know the struggle to achieve a nice smokey eye? If you don´t have hooded eyes, or don´t know what that is: it basically means that you can not see the crease of your lid when your eyes are open- they are "hidden"- only looking down makes them visible. You can be born with this "feature" or you might get hooded eyes as you get older because our skin tends to sag and then we are all in the same neighborHOOD lol. This is pretty common and I have more Tips on how to apply eyeshadow on hooded eyes here but today I show you how to achieve a smokey eye on hooded eyes. Typically us girls "in the hood" don´t have that much space to work with, which is why we have to work a little different than the girls with lot´s of space and big eyes. But it is all doable! ;-)
Here comes my step by step tutorial. I used the Gwen Stefani Palette that I reviewed here. It is right now ON SALE for $39 and I can highly recommend it.
STEP 1. APPLY BLACK EYESHADOW ON YOUR LID!
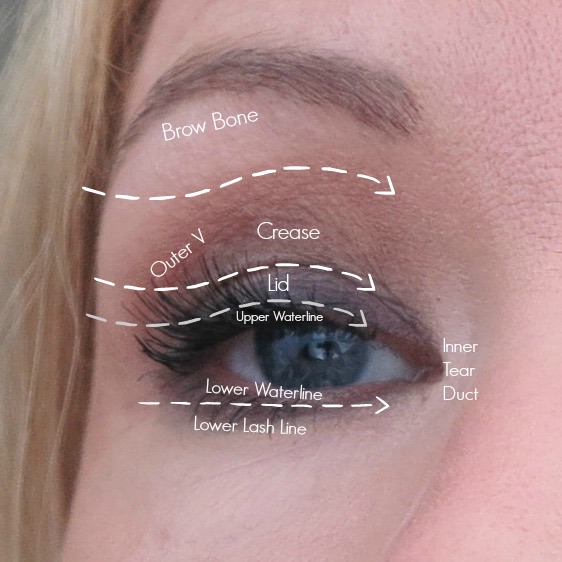
Use either a black or dark grey eyeshadow (I used "Serious" from the Gwen Stefani Palette) and line your upper and lower lash line with it. Smoke it a little up on your lid- but stay on your lid. Don´t go into the crease with the dark color.
STEP 2. APPLY A TAUPE OR RUSTY COLOR IN YOUR CREASE!
Use a taupe, a light to medium brown or a rusty color in your crease (I used "Zone" from the Gwen Stefani Palette)- since your crease is hidden, go a little further up on top of your natural crease. Blend, blend, blend. Blend also a tiny bit into the darker color on your lid.
STEP 3. DEEPEN YOUR OUTER V!
Use a little more of the crease shade you picked in Step 2 and deepen up your "outer V" with it. Of course you could also use a darker shade. Just be careful and don´t overdo it.
STEP 4. HIGHLIGHT YOUR INNER TEAR DUCT AND BROW BONE!
Lighten up with a light shade (I used "Blonde" from the Gwen Stefani Palette) your inner tear duct and under your brow bone. This creates the illusion of a bigger eye area.
STEP 5. TIGHT LINE!
Super important! Tight-line your upper waterline- which means to use a black eye pencil (I used the Urban Decay Glide on pencil in black velvet) or a gel liner (I like these here) on your inner upper waterline. I know, if you have never done this, it sounds scary! But try it! This is so much better then lining above your lash line since it saves us space there! Remember: We don´t have that much space to work with!
STEP 6. USE FALSE LASHES IF YOU ARE GAME!
False lashes help open up the eye. I used 2 trios by Ardell for my look here but I personally don´t ever wear false lashes out in public lol. ;-)
STEP 7. NUDE EYE PENCIL IN YOUR WATERLINE!
Using a nude or white eye pencil in your lower lash line can open up your eyes as well. I recommend the Nyx wonder pencil in nude or the Nyx Slide on pencil in white.
STEP 8. LOTS AND LOTS OF MASCARA!
What would I be without mascara? My favorite mascara to oomph up those lashes is the Too Faced Better than Sex. Lay it on girl. 2 or 3 or more layers. Can´t be too much mascara- right? I prefer not to draw too much attention to the lips when I have a smokey eye but that is up to you. Now go out in the world with your smoking hot eyes. ;-)
ON MY FACE:
- It Cosmetics CC cream
- Skinn by Dimitri James eye primer
- Gwen Stefani Eye Palette ON SALE FOR $39!
- It Cosmetics bye bye undereye
- Advanced Mineral concealer
- Hourglass Ambient palette
- Nyx lipliner Pumpkin
- Arbonne lipstick Dream
- Too Faced Better than sex
- Ardell Adore Trio lashes
- Billion Dollar Brow pencil
- Elf Brow gel
- It Cosmetics Face disk
- UD Glide on pencil Black Velvet
ON MY NAILS:
Wet n Wild Wet Cement & Wet n Wild Undercover on accent nail


Comments
Post a Comment